 Azmodon
it's on a very large list of things I have planned to complete before the first race, basically once the snows gone I'll be back with an update.


it's on a very large list of things I have planned to complete before the first race, basically once the snows gone I'll be back with an update.
__________________________________________
![]() View my fuel log 2015 Micra SV automatic: 7.1 L/100 km ... 39.9 mpg (Imp) ... 14.1 km/L ... 33.3 mpg (US) ...
View my fuel log 2015 Micra SV automatic: 7.1 L/100 km ... 39.9 mpg (Imp) ... 14.1 km/L ... 33.3 mpg (US) ...
Can we have some more of these thingys ?!?!lol holy look at em all
__________________________________________
![]() View my fuel log 2015 Micra S manual: 7.7 L/100 km ... 36.8 mpg (Imp) ... 13.0 km/L ... 30.6 mpg (US) ...
View my fuel log 2015 Micra S manual: 7.7 L/100 km ... 36.8 mpg (Imp) ... 13.0 km/L ... 30.6 mpg (US) ...
MetroMPG (01-18-2018)
Might be overkill with an enclosed wheel :P but I'll be starting to print and mould the infinity wings for the splitter this weekend.
__________________________________________
![]() View my fuel log 2015 Micra SV automatic: 7.1 L/100 km ... 39.9 mpg (Imp) ... 14.1 km/L ... 33.3 mpg (US) ...
View my fuel log 2015 Micra SV automatic: 7.1 L/100 km ... 39.9 mpg (Imp) ... 14.1 km/L ... 33.3 mpg (US) ...
Only six months late...
I don't know how many clips are along the bottom, I don't care to count them since they're no longer on the car lol. The only thing holding the bumper on (as it's been for months) is the 2 bolts under the tail lights, the clips along the edge, and the flares. (also removed the bolt and nut at the termination point in the wheel well.
So - removed lights, bumper, and foam thing:
If you don't have an impact wrench, get to twisting... spare tire needs to come off and the cage removed - once removed you can unbolt the latching bracket for it near the rear of the car - there's also the hub mount for the spare hanging down in the middle:
Used a jack to mock up the location and measure for support rods - homedepot had a sale on 3/4" thick wall aluminum tubing... so summon your inner smith and get to banging
There's a dimple in the middle of the rear end, being stiffer than the surroundings, that's the centre of the truss assembly - 1/4"-20 steel riv nut insterted
For the front end, another dimple a few inches off centre was picked and drilled through in to the trunk and sealed with silicone - and the hub pad for the spare had its central hole enlarged to receive a 'PlusNut' (giant rivnut that can take ~2500 pounds) - 1/4-20 stainless steel rod and front mounting tube attached giving the front 2 points of contact - a third that's not pictured is from the remaining cage bracket right above the rear axle, gives the front two separate supports at 45 degrees to one another, and the threaded rod applies tension to both.

__________________________________________
![]() View my fuel log 2015 Micra SV automatic: 7.1 L/100 km ... 39.9 mpg (Imp) ... 14.1 km/L ... 33.3 mpg (US) ...
View my fuel log 2015 Micra SV automatic: 7.1 L/100 km ... 39.9 mpg (Imp) ... 14.1 km/L ... 33.3 mpg (US) ...
The cage's front latch is in the shot below for clarity, it has a slot so it's more forgiving for positioning, you can also see the hole pre-enlargement:
Moving back to the rear, a washer stack was used behind the second tube to bring it off the body panel, and 2 strips of neoprene (chemical / petroleum etc resistant) rubber were zip tied to the central pin and around each tube so movement doesn't cause tinking:
The next step was balancing the unit on my chest while doing the worm to get under there. Had a friend install the two bolts at the truss while I mounted the front end - once it was up, it was still wobbling in the rear (truss only acts on a plane, need the third datum)
A long time ago I had ordered two sets of splitter support rods from asia, they impressed me because the threaded ends are cut from the main rod, it's not a threaded rod inside a decorative casing, and the thing's some type of steel given they're ferritic. While I didn't end up needing them in the front, to my pleasant surprise they just so happen to be exactly the right length to reach from pre-drilled holes I made "just in case", and the windows in the crash bar.
So the smaller of the two made the rear end completely rigid. But after some leaf blower testing my cable support system wasn't stable - the main body prevents rotation on the Z, the cable prevents up and down flapping (rotation on the Y), but the winglette could still feather from 7 degrees to flat near the tips, speed dependent, as it rotated on the X... so the long rods run from 1.5" from the leading edge, to the middle mounting hole for the vents I printed... and tada 'dat booty doh'
Kicking it feels stiffer than most body panels
__________________________________________
![]() View my fuel log 2015 Micra SV automatic: 7.1 L/100 km ... 39.9 mpg (Imp) ... 14.1 km/L ... 33.3 mpg (US) ...
View my fuel log 2015 Micra SV automatic: 7.1 L/100 km ... 39.9 mpg (Imp) ... 14.1 km/L ... 33.3 mpg (US) ...
Daox (09-10-2018),MetroMPG (09-17-2018),MrMicra2015 (09-12-2018),Pete (09-11-2018),ptbo micra (09-11-2018)

Hot damn! Will look good on the track at Tremblant!
Get your MICRA-FORUM.com decal HERE!!
Micra Meets: Loyalist Pkwy '15, '16 | Classique d'automne '15 '16 '17 '18 | Forks of the Credit '16 | Mosport '16 '17 '18

its unique and a feat of engineering....
2015 Micra S (manual)
no A/C /no power options/ block heater/4x 2 Ohm speakers...all factory stock in 2015
Feb 2015 build
9,999 purchase price + tax..no additional 1600$ because it was a 2015 purchased in 2016
so receipt says $8,399....+1600 .... so they look good i guess...for a brand new car!

 Reply With Quote
 1998 Nissan SKYLINE ER34 2.5GTT
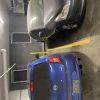 2007 INFINITI G35x AWD Sedan
 3N1CK3 > N1CK33 "NISMO" MICAR
 Eleanor
 Ramona
 Mr micras marvelous 2015Micra